
When creating a bootable Windows USB, you might hit this classic issue:
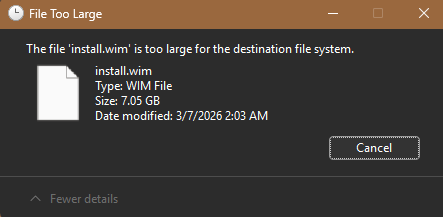
The file ‘install.wim’ is too large for the destination file systemThis happens because most bootable USB sticks are formatted as FAT32, which has a 4 GB file size limit. Modern Windows images easily exceed that.
Instead of reformatting to NTFS (which can cause boot issues on some systems), the best fix is to split the WIM file.
✅ Why splitting is the best approach
- Keeps your USB FAT32 (maximum compatibility)
- Works reliably with UEFI boot
- Fully supported by Windows Setup
- No functional differences during installation
🛠 Step-by-step: Split install.wim
1. Prepare your USB
- Format your USB as FAT32
- Copy all files from your Windows ISO to the USB
- You will hit the error when copying
install.wim
2. Mount your ISO
Right-click your ISO and choose:
MountLet’s assume it becomes:
E:Your USB drive:
D:3. Open Command Prompt (as Admin)
4. Split the WIM file
Run this command:
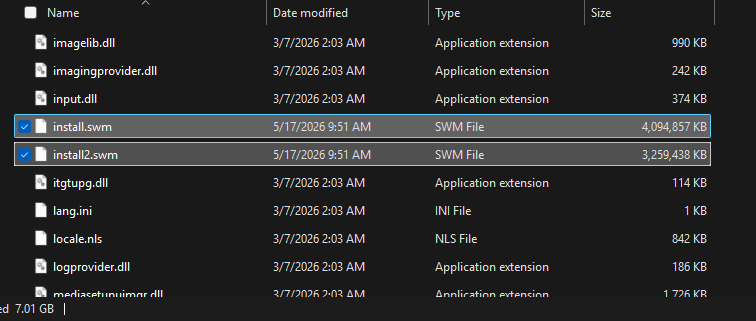
dism /Split-Image /ImageFile:E:\sources\install.wim /SWMFile:D:\sources\install.swm /FileSize:40005. What happens next
- The large
install.wimgets split into:
install.swminstall2.swminstall3.swm...- Each file is under 4 GB → FAT32 compatible
- Windows Setup automatically detects and uses them
6. Clean up
Make sure:
- Do NOT copy the original
install.wim - Only keep the
.swmfiles inside:
D:\sources\✅ Result
You now have:
- A fully UEFI-compatible bootable USB
- No file size issues
- A setup that works on pretty much any device
💡 Extra tips
- If your ISO already contains
install.esd, you won’t have this problem (it’s smaller) - This method also works for custom images and captured WIMs
- You can lower file size (e.g. 3000 MB) if working with very strict environments
👍 When to use this method
Use WIM splitting if:
- You need maximum compatibility across devices
- You’re deploying in mixed environments (old + new hardware)
- You want a solution that just works everywhere